
 We are living in an age where visual impressions seem to matter more and more. Images clamour for our attention, the flashing screens that occupy so much of our time both at work and at home carry everything from business to knowledge and entertainment. Whatever grabs out attention will have a distinct advantage over less visual presentations, from the book cover to the advert… regardless of the quality behind the brightly coloured façade.
It makes perfect sense, then, when we are told that adding an image to a post is a good idea. A post, update or tweet with an image will get, depending on your source, up to twice as much attention and engagement than its equivalent without, and it takes little thought to realise that blogs requiring little or no reading, but which focus mainly on images are easy to ‘like’, follow and share.
What if your blog is mainly text based though? It is, for many bloggers, the words that matter most… the books you are trying to promote, the message, story or information you want to share. There is still room for illustration… for an image that will capture both attention and imagination.
• The safest way to avoid any issues is to use your own images… photographs, artwork, or graphics. An image does not have to be fabulous to be effective!
• You can find images anywhere… but be aware of copyright restrictions and read Creative Commons licences to make sure you can use them. Do not alter or adapt other people’s images without permission or unless the particular Creative Commons licence permits derivative works.
• Look for public domain images online… there are many available.
• Search stock photos sites for free images, most sites have them available, but read the terms and conditions of use. Government bodies, like NASA for example, may also have freely usable images.
• Many bloggers, including me, are happy to have you use their images online, providing full credit and links are used back to the original page. If in doubt, ask.
• You can add online images by copying and pasting, or by using ‘add media> insert from URL’ though this may upset your formatting. You may also end up with a very large image. I find the least problems occur by saving the image to the desktop, uploading it and then you can choose the size and position without problems. It is useful to title photos appropriately. The ‘title’ does not show on the blog, but does allow you to find the shot again in your archives and can be useful in other ways too. You can also use the ‘title’ space to add any wording included on the photo… a quote or haiku for example… so that anyone visually impaired and using text to speech can still read the picture.
• To credit and link back to any image used from another site, the simplest way is to add the source as a caption, then , once inserted, highlight the caption and create a link with the URL of the original image or page.
• Unless you are a photographer/artist offering high resolution images, resize to around 1000 pixels on the longest side to save storage space. Using a lot of images soon uses up the standard WordPress allotment.
• You can crop, resize and add text to your own images with just about any free online photo editor… and even in the humble Paint programme on your PC. For more editing options, try Canva, Pixlr Editor, Pixlr Express (my favourite for very quick fixes) or PhotoFlexr.
• Have fuzzy images… right subject, poor photo? Or just need an artistic effect? Or even a bit of artwork for a book cover…Try Fotosketcher. Tip: If you download their programme, slower computers will work much quicker if the images are resized before using this programme.

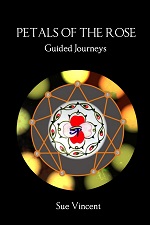
Original rose photo, resized in Paint, showing three of the effects from Fotosketcher, collage via Pixlr Express,


Good advice. I’ll consider using it 🙂
LikeLike
You don’t need it 🙂
LikeLike
Pingback: Looking good -10 simple tips for adding images | oshriradhekrishnabole
Great advice! 🙂
LikeLike
🙂
LikeLiked by 1 person
What an incredibly helpful post! I’m no photographer and I don’t have an artist’s eye like you, but I do get the importance of images. [Heads off to download FotoSketcher…]
LikeLike
Alas, no FotoSketcher for we of the Mac persuasion…
LikeLike
There must be a similar programme somewhere, Barb.
LikeLike
I hope you can find something that works!
LikeLike
Me too, sounds like something I need to have a go at…
LikeLike
🙂
LikeLike
Very good advice Sue 🙂
LikeLike
Thanks Judy!
LikeLiked by 1 person
I didn’t know of Fotoksketcher…thanks for the tip. That rose is beautiful ! ☺
LikeLike
It’s great, isn’t it?
LikeLiked by 1 person
Thanks for these tips, Sue. A picture paints a thousand words in my humble op.
LikeLike
And you post such beauties Jean!
LikeLike
Ah, thanks Sue. There’s L O T S of room for improvement.
LikeLike
😀
LikeLike
Just found FotoFlexer and I must say, it’s my new addiction… ❤
LikeLike
Good, isn’t it?
LikeLike
Thanks Sue. Hopefully sooner vs. later I’m going to use the camera I received over a year ago and upload to the computer. I don’t know how to do that but think its easy.
LikeLike
If you are on a Windows PC, you can usually just plug it in via the USB and wait… and it will bring up a menu for you to import images 🙂
LikeLiked by 1 person
Hi, Sue,
Thanks for the advice. I’ve been buying cheap photos from some of the stock photo sites. Their terms of service say these photos can be used and modified for web sites, book covers, etc. The lower resolution photos are not expensive at all.
I’ve been using GIMP to work on my book-cover purchases, which is a free image-editing program along the lines of very expensive Photoshop. I’ve barely mastered a fraction of what it can do, but I find it gives me a lot more power than any of the tools on my Macs. (I gather from one of the comments that i couldn’t use some of the recommended tools on a Mac.)
I have noticed that my media library on WordPress seems to download photos from other sites I visit and stick them in my library. I tried deleting them but they just came back. I don’t use them, since I don’t even know where some of them came from! I need to contact WordPress to see why this is happening. Anybody know?
LikeLike
Any time you reblog a post, the images will stay in your media library.
Gimp is an excellent programme for anyone wanting to expand their use of images. Pixlr Editor does much the same as Gimp.
LikeLike
That’s helpful advice, Sue. Fotosketcher looks good. 🙂
LikeLike
It is a bit of fun… and very useful 🙂
LikeLiked by 1 person
It looks great. I’m going to seek it out and have a go.
LikeLiked by 1 person
Reblogged this on Kim's Author Support Blog.
LikeLiked by 1 person
Thank you Kim!
LikeLiked by 1 person
You’re welcome, Sue! 🙂
LikeLiked by 1 person
Thanks for the advice, Sue. It’s an area I know I fall down on, sometimes posting without including an image because I can’t find something appropriate or that I know will definitely not lead to copyright issues. I’ll work on it.
LikeLike
Pinch anything of mine if you like.
LikeLike
Thanks for the tips, and especially the links! Those will come in handy 🙂
LikeLike
Worth having a play 🙂
LikeLiked by 1 person
Thanks, Sue. I’ve been wondering how to do some of those things. Now I shall go play and figure it out. 🙂
LikeLike
🙂
LikeLiked by 1 person
Pingback: Adding Text to Images | Love, Laughter, and Life
Sue, I shared about your post on my blog and included the link to this post. 🙂 https://angiequantrell.wordpress.com/2016/01/22/adding-text-to-images/#comment-413
I had great success with the pixlr program, and was able to add the image to my post. But once I posted the post, the image disappeared! Now I have to figure that out! But at least I can add text to photos now, thanks to you. 🙂
LikeLike
Thanks, Angie. That sounds pretty typical 🙂
LikeLiked by 1 person